Thursday, April 11, 2013

One Step Caramel Corn

I looooove caramel corn.  My mom makes the most delicious caramel corn.  Sometimes she even makes some and mails it to me.  There is always an epic battle in our apartment when these packages arrive.  For some reason Nick believes he should be given equal claim to this caramel corn which I find to be completely untrue!  While I love this caramel corn it can be a bit of a production to make.  Sometimes you want caramel corn but you don't want to deal with the dishes that are created by making caramel (everyone HATES cleaning those pans!).  Enter this recipe.  It's very quick, easy, and most importantly mess free.  Also it doesn't use the typical butter and sugar so you can feel a little bit better about chowing down!


To make this caramel you just stir together all the ingredients, toss the popcorn in the mixture, and bake.  It's that simple.  The flavor is pretty unique.  While it has the delicious, light crunch of caramel corn it has the fantastic flavor of honey.  Not being the world's biggest fan of honey I was skeptical of the product but I ended up absolutely loving it.  Will it replace my mom's caramel corn?  Heck no!  Nothing would replace that!  Will it be added to my list of quick and easy snacks?  You know it!  


You can add all kinds of flavors to this.  The original recipe I saw added some spices (think a pinch of cayenne or ancho chiles) and maple syrup instead of honey.  Or you can sub out the nuts for mini chocolate chips or mini M&Ms if you're a chocoholic.

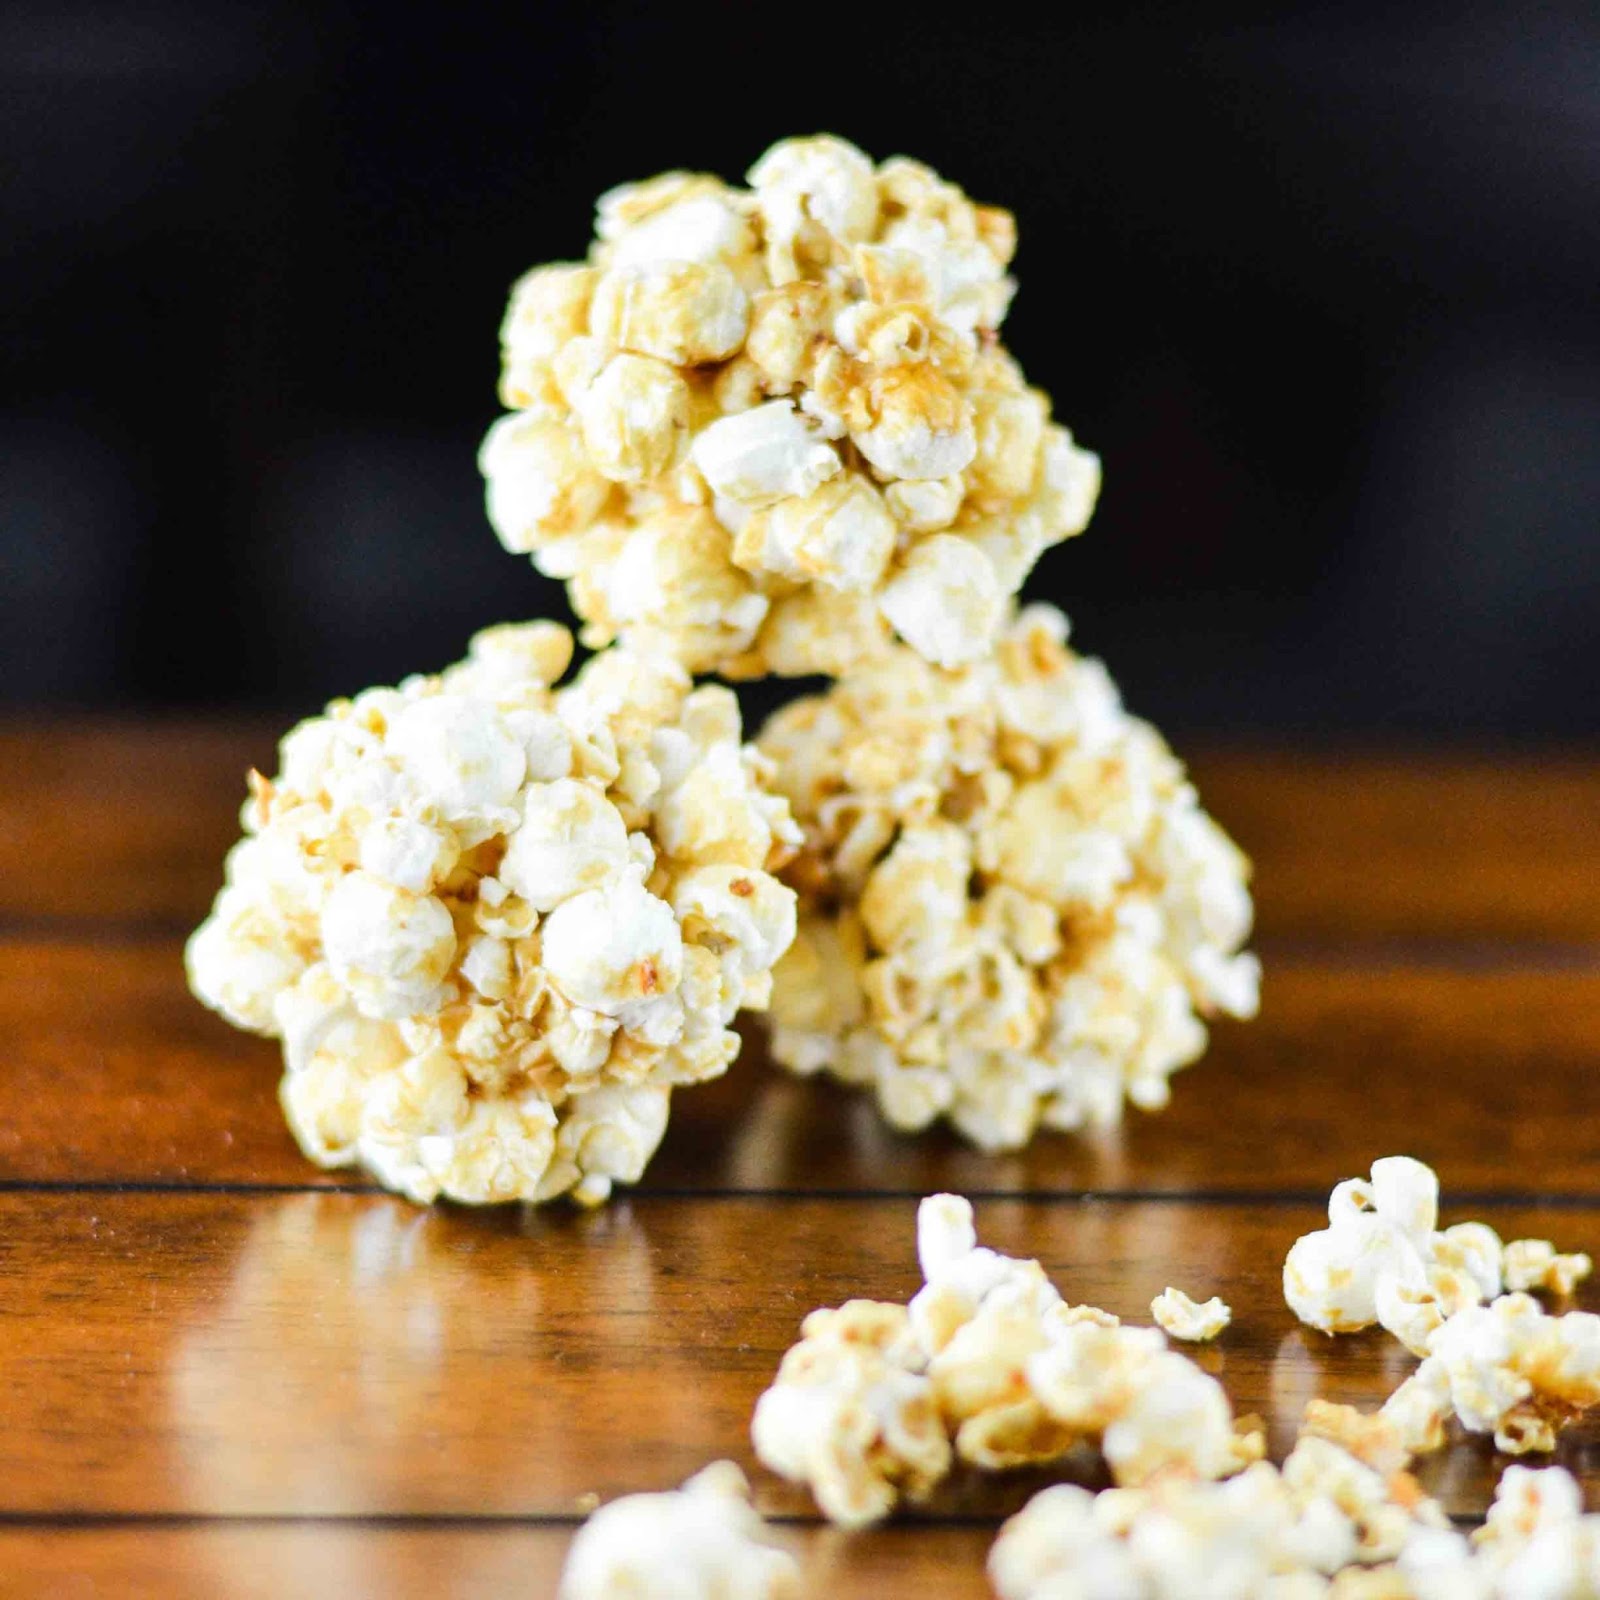
Honey Caramel Popcorn Balls Recipe


Ingredients
yields about 5 servings
1/4 cup honey
1 T. canola oil
1/4 t. salt
1 T. brown sugar
12 t. vanilla extract
2 T. chopped almonds
6 cups air-popped popcorn

Directions
1) Preheat oven to 300 degrees and line a rimmed baking sheet with parchment paper, a Silpat, or lots of cooking spray.

2) In a bowl whisk together all the ingredients except the popcorn until well combined.  Add the popcorn and toss well until evenly coated.

3) Place the popcorn on the baking sheet and bake until the popcorn is glistening about 20-25 minutes.  Remove from the oven allow to cool until it is easy to handle without burning yourself.  Here you can mold it into popcorn balls (about the size of baseballs) the same way you would make a snowball.  Or you can just fluff it up and put it in a bowl to eat.

**This will store in an air-tight container for 3-4 days without going stale.

You may also like some of these recipes:
Salted Caramel, Chocolate Tart
Chocolate, Pistachio, Cranberry Popcorn


Monday, April 8, 2013

Borracho Beans

This is my official, welcome back, post.  I wanted to start out with something that was distinctly Texas since the reason I have been away for so long was because of the move.  Since we arrived about one month ago we have had some absolutely delicious meals in San Antonio.  One of our favorite new items is called Borracho Beans.  This is a dish found at many local Mexican restaurants in San Antonio.  In Spanish borracho means drunk.  So these are basically drunken beans.  They are stewed in a mixture of stock and beer and they have a really fantastic flavor.


These beans usually contain tomatoes, onions, and jalapenos.  I added some bell pepper to add a little extra flavor; I even left most of the seeds in the peppers to give it a little heat.  We have only been Texans for about a month now but we already love our food spicier than before we left!


Generally to make borracho beans you start out by purchasing dried beans and soaking them then letting the beans stew for a few hours.  I didn't feel like baby sitting beans all day (because we have a new addition to our home that I would much rather spend my time babysitting anyway... see note below).


Instead, I opted for canned beans which were packed with no salt or bacon.  It makes things go much faster and while it may not be exactly the same as the ones that stewed all the live long day I think they are still very delicious and have a quite authentic flavor.  You can use about any beer you like to make these.  I chose a local Texas beer, Shiner Bock.  Regardless of what you choose be sure to serve the beans with a cold one of the same brand to your guests.  Since the beer is in the beans it will pair perfectly with the cold beer.  I served these beans with jalapeno and cheddar smoked sausages for a Texas twist on Beans and Weenies.


Can't wait to share more Texas recipes with you now that we are all settled in the new place.  Sorry for the long absence - I'm glad you all stuck around!  Oh and you were wondering what I was spending my time babysitting instead of beans?  This little guy.  We adopted Moriarty from the pound this weekend and this 4 month old bundle of energy has been the center of our worlds since the day he trotted into our apartment.


So instead of babysitting the beans I babysat this guy.  Beans never played fetch and then snuggled on the couch.  Artie wins :)

Chipotle's Cilantro Lime Rice Recipe
Roasted Corn Salsa
Slow Cooker Salsa Chicken


Ingredients
yields 6-8 servings
4 oz bacon, chopped
1 small white onion, diced
1 small bell pepper, diced (I used 1/2 a red and 1/2 a green)
1 small jalapeno, diced
3 cloves of garlic
2 medium roma tomatoes, diced
1 t. chili powder
1 t. oregano
2 T. chopped fresh cilantro
2 cans pinto beans, rinsed and drained
3/4 cup chicken stock
1 12 oz beer
chopped avocado for garnish

Directions
1) In a large stock pot or dutch oven heat the bacon over medium until fat has rendered.  This should take about 5-7 minutes and there should be some bacon grease in the pan. 

2) Add onion, bell pepper, and jalapenos to the pot and continue to cook until veggies have softened, about 8-10 minutes.  Add the garlic, tomatoes, chili powder, and oregano and saute for 2-3 more minutes.

3) Add the cilantro, beans, stock, and beer into the pot and increase the heat to medium-high.  Allow to simmer for 20-30 minutes or until most of the beer flavor has cooked off.  Serve with avocado slices or fresh cilantro and, of course, another beer!


Tuesday, March 19, 2013

We Moved!

Well hello there!  I can't believe how long it's been since I posted.  I actually don't even want to look at the last date because I will just be absolutely embarrassed by the amount of time that has passed.  I am not generally one to offer up excuses but I would like to explain my recent absence... We moved to Texas!!


That's right, after 5 years living in the DC area we decided it was time to try something new and different so we packed our bags and hit the dusty trails (i.e. Route 10) and headed to the Lone Star State.  San Antonio to be exact.  When we first crossed the state line into TX from LA we ran into this awesome statue at the rest area! It's a little blurry but that is me laying on the side of the star... big star huh?  I guess it's true... everything is bigger in TX! :)


We had movers bring the boxes (after we had the fire department rescue them from the elevators they locked themselves in... long story!!) but Nick and I spent 3 days driving half away across the country (halfway across and half way down!).  It took us nearly 28 hours of driving time but we made it in one piece and I didn't even have to abandon him on the side of the highway.  Here is our route... it looks so long on the map! We met some old friends in Atlanta and they took us our for a DELICIOUS brunch and long walk to take our minds off the car trip.  Nick had "tot-achos"... nachos with tater tots instead of chips... I will DEFINITELY be making these soon - stay tuned ;)


We arrived here last week and spent the past week living on an air mattress in our living room waiting on our things to arrive.  After a long week of waiting they arrived yesterday in a giant truck and now we are living in a fortress of boxes!


Despite all the boxes and the chaos I am super excited because look at this kitchen! I'm so excited to make awesome recipes for the site there!  (And maybe some videos?!?).  I walked in the door from work and there was Nick standing over the table; it was the first thing he built knowing that I was anxious to get back into the kitchen!  What a nice guy :)


After a long evening of unpacking last night Nick and I ordered some Chinese take-out.  While the food and beer (that's right... they delivery beer in TX!) were both great the best part was the fortune in the fortune cookie which I am taking as a sign that all is right with our decision to move...


Thanks fortune cookie... I will!  Well that's all for now.  Don't you worry though, I'll be back in just a few days with some great recipes for you.

Y'all come back now, ya hear! :)

Saturday, February 23, 2013

Parsley and Farro Salad

I have been wanting to cook with again since I made the farro risotto.  I feel like I see it popping up in recipes, blogs, and restaurants all the time but had never tried my hand at cooking it.  A few weeks ago I decided I would test it out and went to the grocery... no farro anywhere!  After looking quite a few places I gave up.  Then last week while at Trader Joe's in Florida with Nick's mom I found some!  It was pre-cooked or instant farro so I thought it was a great way to test it out.  It's super simple to make, basically the same preparation as rice.  Put in boiling water, cook until done, fluff with fork.  


If you haven't had farro before it's like brown rice and barley had a baby.  Nice chewy texture and a mild flavor.  It's just begging to have some herbs and dressing added to it for a nice rice pilaf-esque side dish.  Here I decided to add basically a honey-Dijon vinaigrette and a lot of fresh parsley.  While it was delicious I found a recipe later in a magazine for a risotto made with farro and I'm definitely going to give that a try next. I think the flavor and texture of the farro will be absolutely perfect in a risotto... oh the possibilities of learning to use a new food :)


Here I serve it with the Honey Mustard Pecan Crusted Salmon I previously made.  The two dishes share lots of similar flavors (both have Dijon, honey, and parsley) so they pair together fantastically.  It's a nice light dinner with tons of satisfying flavor.  They them together for dinner and I promise you won't regret it!

Honey Mustard and Pecan Crusted Salmon
Farro Risotto with Burst Tomatoes
Shrimp and White Bean Stew


Ingredients
yields 4 servings
1 (8 oz) package farro or pre-cooked farro
1 1/2 T. lemon juice
1 T. olive oil
2 t. Dijon mustard
2 t. honey
1/2 t. salt
1/2 t. pepper
1/2 cup parsley, chopped

Directions
(1) Prepare farro according to instructions on the package.

(2) Combine lemon juice, olive oil, Dijon mustard, honey, salt, and pepper in a small mixing bowl and whisk to combine.

(3) Toss the finished farro with the lemon juice mixture.  Sprinkle with fresh chopped parsley.  Serve warm or cold.


Tuesday, February 19, 2013

Honey Mustard Pecan Crusted Salmon

A few weeks ago I looked at my Recipe Index and realized that my "seafood" category could easily be relabeled as "shrimp" because that was the only seafood I had up there!  I do make a lot of shrimp for Nick and I but there are plenty of fish to fry so I decided to come up with a tasty fish dish.


This recipe specifically is dedicated to my mom.  The woman hates fish.  Unless it is made in a pub and ends in "and chips" she can't stand the stuff.  So I thought I would make something for her that I thought she would maybe be able to choke down.  This dish is awesome.  All the flavors together along with the pan searing and slow cooking makes this fish buttery delicious and the Dijon mixed with honey, pecans, and parsley give this a sweet, tangy, and savory flair.

Wednesday, February 6, 2013

Vanilla Orange Panna Cotta

It's been a while since I did a dessert so I thought I would make a fun one before Valentine's Day.  One of my favorite things to serve after a nice dinner is a fancy dessert.  But I don't always feel like making something at the time.  That's where a dessert like this comes in handy.  It can be made up to 24 hours ahead of time and just sits in the fridge until you're ready for it.


For those of you that have never had panna cotta before it's a custard-like dessert made with milk or cream and some flavoring.  It has a creamy but delicate texture.  Like a pudding and a mousse had a baby and dressed it up real fancy. This one has fantastic flavors in it.  The vanilla bean and orange make it taste like a creamsicle.

Friday, February 1, 2013

Baked Buffalo Wings

Doesn't everyone love wings?  One of the best bar foods there are.  They are delicious and messy to eat.  I decided to make some homemade chicken wings this week. With the Super Bowl coming up I knew I wanted to test out a party food or two.  These were super simple to make and pack a ton of flavor.

While I love chicken wings I didn't think I wanted to fry mine.  I already get enough fried food in my diet from eating out so when I make things I home I try to keep them at least a little healthier.  These are baked in the oven but don't worry - they still get that fantastic crunch of the fried kind thanks to a few minutes under the broiler right before they are finished.  They cook in the oven without the sauce and are tossed in the sauce right before serving.  Leaving the sauce on too long will make them loose that fantastic crunch so be sure to do that at the very end.

Sunday, January 27, 2013

Elvis Style Granola

I love granola.  It's one of my favorite snacks.  Whether it's on top of yogurt, served with milk, or plain I love to snack on it.  A friend of mine a few months ago made some homemade granola and just raved about it.  She said everyone should be making it on their own because (1) it was incredibly easy to make and (2) it is super cheap.  Cheap and easy, huh?  Two of my favorite things so I knew I had to give it a try.  The recipe she used actually used fruit to flavor the granola.  She used pumpkin to make a pumpkin pie spice flavored granola.  While this sounded delicious I thought I would try to make mine like my favorite Bear Naked Banana Nut.


So I tweaked her recipe just a bit and came up with this delicious granola.  The made the house smell absolutely fantastic while it baked.  When it was out of the oven Nick and I each tasted a little to see what we thought... about two bowls (each) later we decided this recipe was definitely a keeper.  As long as it's stored in an air-tight container this stuff will last for almost a month without going stale.  Ours definitely didn't make it quite that long... maybe next time I'll double the recipe.

Monday, January 7, 2013

Farro Risotto

Normally my posts are a few days behind.  Between making the food, photographing it, cleaning it up, and eating it there usually isn't time to process all the photos, type up the recipe, and think up the post.  Today, however, is the exception.  Today I experimented with a new recipe which I thought would take a few tries.  As it turns out first time was the charm and this was delicious.  It may be one of my favorite things I have ever made.  Nick and I wolfed down this risotto - we just couldn't get enough.  The farro has this fantastic nutty flavor, the white wine adds a delicious tartness, the tomatoes - which were roasted in the oven - give a savory tang, the Parmesan cheese and butter gives it a creamy and delicious mouth feel.


This recipe was actually inspired by a dinner I had while visiting my friend Kim in Chicago a few months ago.  She took me out to a really fantastic Italian restaurant for dinner.  We had the chef's tasting menu which was so fun.  I can't think of anything better than being given 10 different courses all of various yummy things.  While there were many dishes that we both loved while we ate a 5 hour dinner that night one that really stood out was the farro risotto.  Neither of us had ever had risotto prepared with farro but what made it even more fantastic was the creaminess of the cheese and the cherry tomatoes that were literally bursting with flavor.


I took tons of pictures and even tasting notes on my phone because I knew I would have to try and remake this brilliant dish when I got home.  Though while typing this I realize how embarrassing of a dinner date that would make me... Oh well, Kim loves food as much as I do and I hope this recipe makes it up to her :)


In order to get the tomatoes to have that bursting with flavor quality I decided to roast them while the risotto cooked.  Then they could be added into the risotto when it was done which gives the tomatoes the perfect texture and taste without risking the tomatoes falling apart.  

Looking for some more pasta recipes?  Try out a few of these:

Shrimp Fra Diavolo
Orecciette with Spinach,
Sausage, and Beans
Fresh Handmade Pasta


Farro Risotto with Roasted Tomatoes and Spinach Recipe


Ingredients
yields 4-6 servings
1 cup farro
1 cup water
1 pint cherry tomatoes
3 T. olive oil
1 medium shallot, minced
3 cloves garlic, minced
1/3 cup dry white wine
6 cups chicken broth
2 T. butter
1/2 cup Parmesan cheese
1 1/2 cups fresh spinach, chopped

Directions
1) Soak farro in water for 30 minutes.  Drain and rinse.

2) Preheat oven to 400 degrees.  Toss tomatoes with 1 T. olive oil and salt and pepper.  Roast for 25-30 minutes or until tomatoes begin to burst.  Place the stock in a sauce pan and heat over medium heat until just simmering.

2) Meanwhile heat the remaining 2 T. olive oil in a stock pot over medium.  Add shallot and saute until softened (about 2 minutes).  Add garlic and continue to saute 2 more minutes.

3) Add farro to the pot and saute until toasted (about 3 minutes).  Add wine and stir constantly until evaporated (about 2 minutes).

4) Add 1/2 cup of the stock and stir constantly until completely absorbed.  Continue to add the stock 1/2 cup at a time until the farro is creamy and cooked through.  Add the butter, Parmesan and spinach.  Stir until well combined and the spinach has just wilted.  Stir in the tomatoes.  Serve topped with fresh cracked pepper.


Sunday, January 6, 2013

Cure for a Cold

Well sorry for the hiatus lately.  Like a lot of people, I came down with the flu last week.  According to Google Trends the flu in the US is currently in a "severe" state (you can check it out here).  For the past three days I have been all sniffles and complaints.  This flu completely wiped me out; I was so tired I could barely get up off the couch. So when Nick called me after work on Friday to ask what time we were meeting for our date I regrettably had to cancel.  I felt horrible.  We were supposed to go to one of our favorite places and have a date which we hadn't had in quite a while.  He told me not to worry about it and he would just pick up some take out or something for himself.  So a half hour later when he walked in the door I was pretty surprised to see a bunch of grocery bags.  "Nothing to worry about - just a few things we needed," he said.  And then, while I laid on the couch watching reruns of Chopped he clattered around in the kitchen for a bit.  A few minutes later he came out to ask the difference between chicken stock and chicken broth and I knew something was up.  I went into the kitchen and laid out on the counter were all the ingredients for chicken noodle soup as well as the wikipedia entry for how to make chicken noodle soup up on his iPhone.


He gave me perhaps the world's most adorable sheepish grin and said, "Well I figured chicken noodle soup was what you needed and I knew you wouldn't fall for any of that stuff from a can... so I'm making it!".  I smiled at him and went back into the living room and watched TV while he made me homemade soup.  I did turn around every now and then to check on him.  Normally it looked like the Swedish Chef was in my kitchen grumbling and throwing things into the air.  Soon everything began to smell absolutely delicious.  After about an hour he emerged from the kitchen looking like he just ran a half marathon with bites of cut up vegetable stuck to his shirt but he smiling like a Cheshire cat as he presented me with a bowl of the most delicious chicken noodle soup there ever was.


There is something particularly special about a homemade bowl of chicken noodle soup when you're sick.  It's healing powers are surely magnified by the time and effort of the person that loves you spending their Friday night at home slaving over a hot stove just to make you something to try and banish your illness.  Did it cure my flu?  No, not really.  Did it make my night and remind me of the reason why I feel in love with this boy?  Of course.  It was one of the nicest gestures and took my mind off the headache and runny nose.  So if someone you know is currently sneezing and sniffling try out this recipe that isn't too hard and will surely be worth it.  Trust me, they will appreciate all your efforts more than they can say.


So a big thanks to my sous chef, who definitely graduated into head chef on Friday with this from scratch creation.  Isn't he just the cutest chef there is?

Chicken Noodle Soup Recipe


Ingredients
yields 4-6 restorative servings
1 small rotisserie chicken from the grocery store
1 (48 oz) container chicken stock
3 large carrots, peeled
3 celery stalks, peeled
1 small onion
1 T. olive oil
1/4 cup fresh parsley, chopped
1 (10 oz bag) egg noodles
salt and pepper to taste

Directions
1) Chop the carrots, celery, and onion.  Try to get the pieces to all be of similar size for even cooking.  Remove the skin from the chicken, take the meat from the bones, and shred the meat into bite sized pieces using your hands or a fork.

2) Heat olive oil in a large stock pot, or dutch oven, over medium heat.  Saute carrots, celery, and onions until they become tender (about 10-12 minutes depending on the size).

3) When the vegetables are tender add the stock and chicken and increase the heat to high until the soup begins to boil.

4) After the soup has begun to boil add in the noodles and cook until noodles are al dente (the package should give you cooking time). When the noodles are ready add in the parsley and serve with a spoon, an advil, and some tissues.  Perhaps some orange juice on the side.  Hope you feel better soon :)

Thursday, January 3, 2013

Roasted Carrots with Ginger and Honey

Well after the fantastic Pan Roasted Chicken Thighs a few days ago I knew I had to do some more roasting!  While at the grocery store I found these insanely cute little carrots.  They must have been grown for a small Bugs Bunny to snack on!  I figured these would be fun to serve and even more fun to eat but I didn't realize how beautiful they would turn out.


If you can't find the miniature Bug's Bunny carrots anywhere you can use either baby carrots or regular carrots that have been peeled and cut into slices.  While this option isn't quite as darling as the little tiny carrots it would just as delicious.  This recipe is based on a recipe that belongs to Nick's mom that Nick just loves.  The addition of fresh ginger and honey gives these carrots a great flavor and makes them something much more unique than just plain old roasted carrots.


I love side dishes like this that take very little hands-on time in the kitchen and produce something that is much more interesting than just plain old steamed veggies.  While I love having fresh vegetables on the table I really hate to serve them without at least a little bit of flavor to keep it interesting.

Looking for more side dish recipes?  Check out these delicious and easy peas or the roasted corn salad:


Ginger Honey Carrots Recipe

Ingredients
yields 4-6 servings
1.5 lbs carrots, cleaned and peeled
1 1/2 T. butter (divided into 1T and 1/2T portions)
2 t. fresh grated ginger
1/2 T. honey
salt and pepper

Directions
1) Preheat oven to 425 degrees.  Clean and peel carrots then cut into even sized slices.

2) Melt 1 T. of the butter and toss with grated ginger.  Place in a roasting pan with the carrots.  Toss the carrots in the butter until evenly coated.  Sprinkle with salt and pepper.  Cover the roasting pan tightly with aluminum foil and place in oven for 15 minutes.

3) Remove foil from pan (carefully!) and continue roasting for 15-20 minutes (or until carrots reach desired tenderness), turning at least twice to ensure even cooking.

4) Remove from oven and remaining butter and stir with honey.  Toss carrots until evenly coated with the honey mixture.


Wednesday, January 2, 2013

Asparagus Avocado Tomato Salad

I actually made this salad quite a while ago while visiting my friend Kim in Chicago.  My first night there we stayed at her Dad's (Pete) house.  Kim's dad is one of the most generous people I know.  A few years ago when I was in college and interning in Chicago with Kim he let me and Kim stay in his house rent free for nearly an entire summer without complaining a bit.  This time he was just as hospitable and offered up his home (and most importantly kitchen) for Kim and I to take over.  One of the dishes I made that night was this salad.  It was super quick and a way to get a lot of colorful veggies on people's plates that packed a lot of flavor.


We ate this salad over dinner with wine while enjoying some of the stories Pete is famous for.  This man has traveled all over and seen so many things that he is great to chat with.  He loves to sit around the table enjoying food and company so we had a great time.


The trip wasn't just making food though.  Kim and I spent the night at her apartment downtown that weekend and had a fantastic meal at an Italian restaurant she frequents.  While there I had one of the best cocktails I have ever had as well as the most delicious short-rib bruschetta appetizer.  I will definitely have to post soon trying to re-create those amazing recipes I had ! ;)  In the meantime enjoy the salad! :)

Asparagus Salad with Gorgonzola Recipe


Ingredients
yields 6 side dish sized servings
12 oz asparagus, trimmed, cut into 2 inch pices
16 oz cherry or grape tomatoes cut into quarters
1 large, ripe avocado, cut into small cubes
1/2 cup basil, finely chopped
1/3 cup Gorgonzola cheese crumbles

Dressing
1/4 cup olive oil
1/2 T. lemon juice
1/2 T. Dijon mustard
1/4 t. salt
1/4 t. pepper

Directions
1) Steam the asparagus until just tender (about 2-3 minutes).  Place in an ice bath to chill.  Meanwhile slice the tomatoes, avocado, and basil.

2) Whisk together the ingredients for the dressing and set aside.

3) Combine the salad ingredients in a large bowl and toss to combine.  Drizzle with dressing just before serving.  Enjoy!

Try some of my other favorite salads...

Stacked Beet and Goat Cheese Salad
Layered Cauliflower Salad

Tuesday, January 1, 2013

Chicken Roasted in an Iron Skillet

Well welcome to the new year.  After a great holiday season with lots of food, drinks, family, and friends I have so much to be thankful for in 2012 and so much to look forward to in 2013.  One of my favorite parts of ringing in the new year is the new year's resolutions.  I actually look forward to these every year as a way to change course, break bad habits, start new habits, and refresh.  This year I decided to also make a new year's resolution for my blog... my goal is to post everyday in January.  In addition my goal is to amp up the veggies, salads, and main dishes since last year I was pretty heavy in the desserts realm.  To start the new year out right I made pan roasted chicken thighs.


I love the flavor of just about anything that has been roasted.  As a Christmas present from Nick's grandparents I received a cast iron skillet (one of the few kitchen items missing from my collection) just like this one: Lodge Logic L10SK3 12-Inch Pre-Seasoned Skillet. I wanted to break it in and couldn't think of any better recipe than pan roasted chicken thighs.  The skillet made all the difference in the world - these were so delicious.  The skin was perfectly crispy and flavorful and the inside was juicy and moist. 


If you don't have your own cast iron skillet you can make this in any oven proof pan or sear them on the stove top and transfer the chicken to a roasting pan to finish baking in the oven.  Though speaking as someone that has made it that way before I would recommend purchasing your very own skillet... especially because now that I have this new fun toy I am sure I will be making plenty more recipes that use it and you will want to eat them all :)


This recipe is super simple and takes only 3 ingredients.  For us, however, it turned out to be a team effort... our overly sensitive smoke detector seemed to be in a mood this fine new year's day and went off, no joke, 15 times.  Nick finally decided to camp out under the thing fanning a pillow for the entire last 12 minutes of cooking... What would I do without him?!  Hopefully he didn't mind all the work because these were so delicious I am certain we will want to make them again.  Though perhaps next time we will just set a fan up on a chair.

Pan Roasted Chicken Thighs Recipe


Ingredients
yields 4 - 6 servings
6 chicken thighs (bone in, skin on)
1 lemon, sliced into thick slices
1/2 T. canola or vegetable oil

Directions
1) Preheat oven to 475 degrees.

2) Season the chicken liberally with salt and pepper.

3) Heat the oil in a skillet or oven proof pan over medium high heat.  When the oil is very hot place the chicken thighs, skin side down.  The chicken should sizzle loudly when placed in the pan - if it doesn't then the oil isn't hot enough yet!

4) Sear the chicken for 2 minutes on medium high heat.  Reduce heat to medium and continue to cook, skin side down for 10-12 minutes or until the skin is a golden brown color all over and the fat has rendered.  If you have a large skillet be sure to check and make sure it's cooking evenly.

5) Places lemon slices in the pan with the chicken and transfer chicken to the oven (keep it skin side down) cook for 12 more minutes.

6) Flip the chicken over and cook an additional 5 minutes or until the chicken has cooked through (the internal temperature should be 165 and the juices when cut should be clear, not red).  Remove from oven, transfer to plate, and allow to sit for 5 minutes before serving.