Showing posts with label Appetizers. Show all posts

Thursday, May 17, 2012

Chex Mix

Cheez-Its, Pretzels, Chex, Cashews... these guests are always invited to my party! Chex Mix is a family favorite.  Growing up I can't remember a single party without it.  So this weekend when I went home to celebrate my baby brother's college graduation I was sure to watch close as my mom mixed up Chex.  


With all our family and friends there to celebrate it was a great weekend.  My brother, the smarty-pants, graduated with a degree in Physics and is going on to Optometry school in the fall, studying at my Alma-mater... IU (go Hoosiers!).  Going home for the weekend is always fantastic but when there are multiple parties it makes it even more special.  


After all the years of making Chex Mix you would think my mom would have developed a better method for allowing it to cool.  You see she spreads it all out on the counter on a paper bag.  I know what you're thinking... what's wrong with that?  Well, while the paper bag is a very effective cooling method, it is *not* an effective security method.  Every few minutes someone walks into the kitchen and steals a handful when my mom turns her back.  I found out she always makes a double batch of Chex Mix due to inventory shrinkage prior to the party.  That woman is a saint.


Well it was great to be home and I'm always sad to leave but, at least the loooong car ride back to DC (11 hours!) was made just a little bit easier by the doggie bag of Chex Mix my mom slipped into my suitcase.  Thanks mom!  Hope you don't mind me sharing your secret recipe ;)

Chex Mix Recipe

recipe adapted from Chex Original Party Mix

Ingredients
yields 15 cups (before shrinkage... you should probably double the recipe)
3 cups rice Chex
3 cups corn Chex
3 cups wheat chex
1 cup pretzels
2 cups cheese flavored crackers (like Cheez-Its or Goldfish)
1 cup mixed nuts
1 cup cashew pieces (because everyone picks out the cashews to eat first)
12 T. (1 1/2 sticks) butter
1/4 cup Worcestershire sauce
1 T. hot sauce
1 T. seasoned salt
1 1/2 t. garlic powder
1 t. onion powder
2 t. black pepper

1) Pre-heat oven to 250 degrees.  Line a large roasting or 9x13 pan with foil.

2) Melt butter in a microwave safe bowl.  Add Worestershire, hot sauce, seasoned salt, garlic powder, onion powder, and pepper.  Stir until combined.

3) Pour all three types of Chex, pretzels, cheese crackers, nuts, and cashews into the pan and toss well.

4) Evenly distribute the butter mixture on top and toss well until all pieces are evenly coated.

5) Place pan in the pre-heated oven and bake for 1 hour removing from the oven and tossing once every 15 minutes.

6) Pour Chex onto paper bags to cool for about 15 minutes.  Monitor closely for thieves; perhaps bring a guard dog or pepper spray to keep the crowd under control. 

7) You can serve immediately after cool or freeze it in an airtight container for up to 2 months.

Tuesday, April 10, 2012

Layered Cauliflower Salad


This post will highlight my Midwestern roots.  That's right, this city girl was raised in Indiana (Go Hoosiers!).  While the city is great there are some things about the mid-west that just can't be replicated anywhere else.  Mainly, the block parties.  I loved the food at block parties.  Everyone brought their favorite dish and we would all munch away on any number of amazing side dishes.  While I had tons of favorites growing up the one that never went out of fashion was my mom's layered cauliflower salad.


Growing up in a close neighborhood was amazing.  I knew everyone that lived nearby and had tons of friends to play with.  Nearly every Friday night we all met up at someone's house and while our parents sipped wine on the back patio we played football, flashlight tag, or street hockey.  And while this would be difficult to achieve in a high-rise apartment, making this salad... is not.  So this Easter I shared this salad with some friends and between ham, salad, and Easter egg hunts I felt like I was right back at home! :)


This salad is super easy to make and truly delicious.  Even as kids we would happily eat our veggies if they came in the form of this salad (I'm sure the bacon and sweet dressing helped!).  This salad makes A TON of food however.  And when I moved out and made it for myself the very first time I quickly realized that it was not to be made for one person (unless you want to eat cauliflower morning, noon, and night for a few days). I did, however, discover that this could be easily adapted for one.  You see all the ingredients can be found at the salad bar in the grocery!  So I would buy a few chunks of cauliflower, a bit of onion, some iceberg lettuce, peas, bacon, and Parmesan.  When I arrived home I would throw together the dressing and layer up the salad and have one happy little serving all to myself!

So don't feel like you can't have this delicious and healthy salad if you don't have an entire block to feed! :)


Ingredients
yields 12-14 servings, unless you try my salad bar trick above and make just one! ;)
1 head cauliflower, chopped
1 head ice burger lettuce, chopped
2 small onions, sliced into very thin rings
1 8oz package frozen peas, do not cook
1/3 lbs bacon, cooked and chopped
1 cup mayo (or Miracle Whip)
1/4 cup sugar
1/4 t. salt
1/4 cup Parmesan cheese
Fresh pepper

Directions
1) Wash and rinse the cauliflower and lettuce.  Break the cauliflower into small florets.  Chop the lettuce into strips (think like the lettuce on Taco Bell tacos) :).

2) Slice the onion into very thin rings.  Chop the bacon into small pieces.

3) Mix the mayo, sugar, and salt together in a small bowl.

4) In a large serving bowl layer the salad.  Place all the cauliflower in first.  Then the lettuce, the onions, and finally sprinkle on the frozen peas (they will thaw on top of the salad).  Pour the mayo mixture on top.  Sprinkle the chopped bacon on top of the mayo and finally the Parmesan cheese.

5) Place the salad in the refrigerator for 1 hour to set; it can stay in the refrigerator overnight if you feel like making it the day before.  Top with fresh black pepper just before serving.


Tuesday, April 3, 2012

Mini Corn Dogs

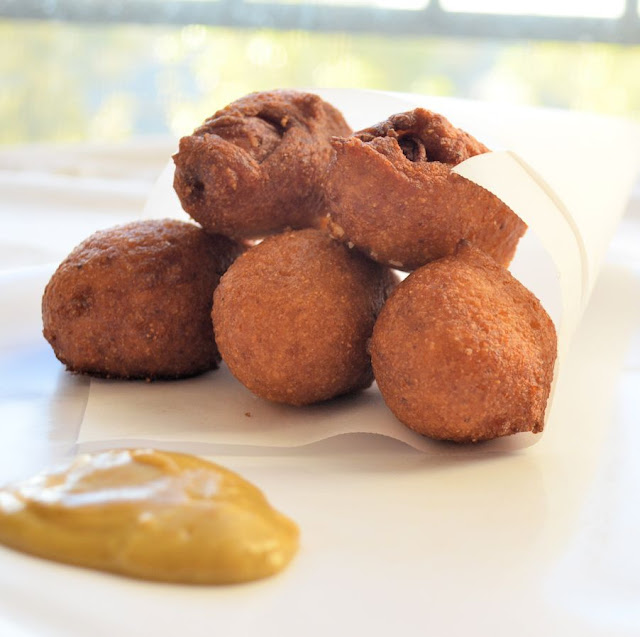
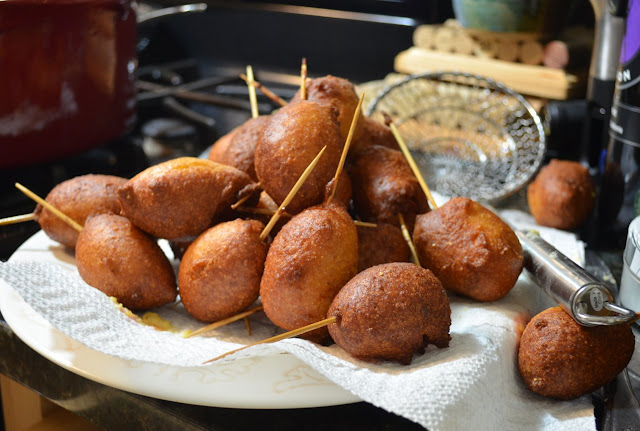
So before we even get started, before that first line is finished, let me apologize.  This post is picture heavy.  I may have gone a little nuts.  Seriously, I think paparazzi take less pictures of Kim Kardashian than I did of these corn dogs.  I couldn't help it.  They were beautiful.  They were shiny and craggy and perfectly browned and the camera just loved them!


So as it turns out I have never fried anything before.  Something about hot oil over an open flame causes anxiety.  I knew it was about time to conquer this fear and move on.  And what better way to reward myself for overcoming this irrational fear with than a plate of hot, crispy mini-corn dogs?  So with the lid to the dutch oven nearby (in case the oil flamed I could put that on quick and suffocate the flame!) and the baking soda in hand (in case the fire leaped out of the dutch oven!) I embarked on my frying mission.


The roughly 6000 episodes of Chopped I have watched on the Food Network taught me to make sure the oil was hot before placing the fry-ee in the fry-er.  I put a thermometer on the side to make sure the oil was 350 before I started but you can ensure your oil is hot by testing a bit of batter.  The oil is ready when the batter sizzles and bubbles.  

Other than the oil there was the batter to worry about.  I knew I wanted it sweet and while a lot of recipes call for sugar I decided to go with honey which would pair perfectly with the honey mustard dipping sauce I knew I would be dunking these little guys in.  This batter uses a hefty amount of baking soda - the fluffier the batter the easier it sticks.  

After making the batter if you are having trouble getting it to stick to the dogs try patting the dogs dry first then dipping them into the batter.  Finally, don't let them hang out after being dipped - toss them right into the hot oil.  The batter will drip off the dog but after it has been placed in the oil it won't continue to run and will adhere to the dog creating the tastiest little covering there ever was.


These mini corn dogs were GREAT.  Nick especially couldn't get enough.  He had polished off the entire batch before I had finished eating my second mini-dog!  Just in case you don't live with a hot dog eating machine and you do have leftovers you can freeze these in an airtight container and reheat them later by placing them in a 400 degree oven for about 15-20 minutes.  Or you can just ship them to my apartment - I know someone that would be more than happy to eat your leftovers ;)

Mini-Corn Dog Recipe

Ingredients
yields about 24 mini corndogs
1 cup yellow cornmeal
3/4 cup all-purpose flour
1 T.  baking powder
1/4 t. salt
1/4 cup honey
1 egg
1 cup milk
1 (16 oz.) package hot dogs
Vegetable oil or canola oil for frying (about 20 oz)
toothpicks

Directions
1) Place a dutch oven filled with about 2-3 inches of vegetable or canola oil and heat to 350 degrees.  You can test the oil to be sure it is ready by placing a spoonful of batter into the oil.  It should bubble and sizzle and start to brown.  If no bubbles form or it only bubbles slightly the oil is not hot enough yet.

2) Combine cornmeal, flour, baking powder, and salt in a bowl.  Add egg, milk, and honey and whisk together.

3)  Cut the hot dogs into 2 inch pieces and skewer each with a toothpick. Dip each hot dog segment into the cornmeal batter and instantly place the battered dog into the hot oil.  The batter will stick to the dog but will begin to run off if you don't put it in the oil quickly.  The batter rises as it cooks in the oil so even if it doesn't look perfect when placed in the oil it will even out while it cooks.

4) Allow each dog to cook in the hot oil until golden brown, about 4-6 minutes per dog.  You can freeze these after they have cooled in an air-tight container and re-heat them by placing them in a 400 degree oven for 15-20 minutes.


Honey Mustard Dipping Sauce Recipe


Ingredients
yields 1/2 cup dipping sauce
1/4 cup honey
1/4 cup dijion style French mustard
1/2 T. hot sauce

Directions
1) Combine all ingredients in a bowl and whisk to combine.  Add additional hot sauce to taste.

Sunday, April 1, 2012

Roasted Beet and Goat Cheese Stacked Salad

I hated beets.  That's right, I hated them.  They taste funny, they look funny, they smell funny.  I did not want to be friends with them.  I did not want them to come over for dinner.  But my friend Kim loves them and I have not been posting much about veggies lately so I thought I would give them a chance and dedicate this post to Kim.  Off to the store I went to find beets.  Oh man, I forgot how truly ugly they are.  Their roots look like the tail of a rat!  I couldn't possibly eat these.  I mean honestly - look at those things.  They look like aliens or something!


As I am not one to give up on a challenge I decided to bring those little aliens home and do some research.  About 15 food blogs later it seemed like roasting them was the best idea to bring out some flavor and sweetness.  I saw a lot of recipes that tossed them with orange segments and sherry so I decided to include both of those flavors.  Finally I decided on a little bit of goat cheese and some micro-greens to bring it all together.


So here went nothing.  I peeled and roasted the beets and then spent 20 minutes washing the beet stains off my hands.  They came out of the oven smelling... could it be? smelling... delicious.  A small and timid bite later I was converted... a beet lover in fact.  I cannot get enough of this salad!  Seriously you're lucky there are pictures I wolfed down about 2/3 of the recipe before I even got started.  The beets are sweet and the roasting gives them a nice caramelized taste.  The dressing is prefect and goes great with both the spicy greens and the sweet beets.  Finally the tangy goat cheese adds nice texture and the perfect rounded taste.  And thus the beet, goat cheese, and micro-green salad was born.  The recipe for this roasted beet and goat cheese salad is super easy and can be made in advance and be served the next day.

Roasted Beet and Goat Cheese Stacked Salad


Ingredients
yields 2-3 salads
1 batch roasted beets, cooled (recipe below)
1/2 cup micro-greens or arugula
4 oz log fresh goat cheese
1 batch orange sherry vinaigrette (recipe below)

Directions
1) Toss the micro-greens or arugula in the dressing.  Slice the goat cheese log into small disks about 1/4 inch thick.  Layer the salad on small serving plates.  Beet, cheese, greens, beet, cheese, greens, beet.

2) Drizzle any additional dressing on top of the salad and season with salt and pepper to taste.


Roasted Beet Recipe


Ingredients
3 large beets, peeled, and cut into 1/2 slices
2 T. olive oil
1/2 t. salt
1/2 t. pepper
1 t. fresh thyme leaves

Directions
1) Pre-heat the oven to 400 degrees.

2) Clean and peel beets (careful they can dye your clothes so be sure to wear an apron or something you are keen on replacing soon!).  Slice the beets into 1/2 inch slices.  Toss beets with the olive oil, salt, pepper, and thyme.

3) Arrange beets on a pan and place in the oven for 20-25 minutes.  Turning 2 times half way through (don't use your favorite white spatula though - unless you want it to become your favorite pink spatula!).  You will know the beets are done when they are tender to the touch.

4) Remove beets from oven and allow to cool.  You can stop here and place them in the refrigerator overnight if you like and make the rest of the salad just before serving.


Orange-Sherry Vinaigrette


Ingredients
2 T. fresh squeezed orange juice (about 1/2 an orange)
1 T. sherry vinegar
1/4 t. salt
1/4 t. pepper
1/2 t. fresh thyme leaves
1 T. finely minced shallots (about 1/2 small shallot)
2 T. olive oil

Directions
1) Place all ingredients except the olive oil in a bowl and whisk to combine.

2) Whisk the in the olive oil.  You can add more to your liking if you prefer your dressings on the less acidic side.  Try adding an additional 1/2 tablespoon at a time up to 2 more tablespoons.  Add additional salt and pepper to taste.

**You can make a double batch of this and keep it around - I really love it drizzled on about any veggie, especially asparagus and green beans.

Tuesday, March 13, 2012

Puff Pastry

My it's been an embarrassingly long time since my last post!  I have no excuse... just that I have been relaxing a bit more lately.  Last week Nick and I went to Florida to celebrate Nick's Grandpa's 80th birthday.  We had an expertly planned surprise party followed by a perfectly executed dinner party followed by some fantastic family time spent lazing by the pool and carefree paddle-boarding in the Gulf.  Not too shabby... not too shabby at all.  But back to reality for this girl!
This post is a bit past due as it has now been weeks (yes that's plural!) since I made this.  Don't worry though - my current haphazard posting makes it no less droolworthy.  In class a few weeks ago we made our very own puff pastry.  Yes, that stuff you usually buy in the freezer section at the grocery.  That's right, I personally made my very own.  And let me be the first to tell you it is definitely worth the time investment!  This particular puff pastry I made into one of my favorite treats... palmiers!

Palmiers are French treats made from puff pastry that has been rolled in sugar and then baked.  They are crispy, buttery, and sweet.  Rolling them in sugar before baking them allows the sugar to slightly caramelize for the perfect flavor and crunch.

The puff pastry is the fun part of the recipe, turning it into palmiers takes a mere few minutes but the puff can be a half day affair.  Puff pastry is made from two layers, one of butter, one of flour.  You wrap the butter layer with the flour layer and roll the dough out and begin to fold it over itself.  Each time you fold the dough you create additional layers of dough, butter, dough.

Ingredients
yields on batch large sheet of puff pastry good for about 30-40 palmiers
Butter Block (or Beurrage)
1 lbs butter
3/4 cup all-purpose flour


Flour Block (or Détrempe)
3 cups all-purpose flour
1 t. salt
2 T. shortening
1 cup very cold water

Directions
1) Cut the cold butter into 1-inch cubes and place in a mixing bowl of a stand mixer with the paddle attachment.  Add in the 4 oz of flour and mix until no visible chunks of butter remain.  Be careful not to over mix the butter as you want it to remain cold throughout this process.

2) Form the butter into a large rectangle on a piece of parchment paper or a silicone baking mat and place in the refrigerator while you make the flour block.

3) Place the flour, salt, and shortening in the mixer with the paddle attachment.  Mix together slowly adding the water until it just starts to come together.

4) After the dough is just combined turn it out on a lightly floured surface and gently press together.  Do not knead the dough.  Rather just press it together much like you would for a pie crust.  You do not want to activate the gluten here or you will end up with chewy puff.

5) When the dough is combined use a knife to cut a cross-hatch into it, cover it with plastic wrap, and allow it to rest on the counter for 10-15 minutes.

Double Turn Completed
6) After the dough has rested take the butter out of the refrigerator and set aside.  Roll out the dough into a long rectangle that is about 1 inch wider than the butter block and about twice the length.

7) Place the butter block onto the flour block and fold the flour block over to wrap the butter block like the most delicious present anyone has ever wrapped.

8) Gently, ever so gently, roll the dough with the butter in the middle out to again create a long rectangle (flouring the surface helps reduce sticking).  This will begin your first "turn".  There are two types of turns you can do: a double turn or a single turn.**  You should start with a single turn, refrigerate the dough for an hour, then do a double turn and refrigerate the dough for an hour.  Then repeat that entire process (one more single, refrigerate, one more double, refrigerate).  And ta-da... you have puff pastry!!

Single Turn Completed
**Notes on Turns**
Single Turn: To accomplish this turn you fold the dough like an old school letter, into thirds, one piece on top of the other (see graphic).

Double Turn: To accomplish this turn you fold the each side of the dough over to meet in the middle.  Then fold the one side of the dough over to meet the other side (see graphic).

9) Allow your newly created puff pastry to rest in the refrigerator for an hour or up to 3 days.  You can also freeze the puff for up to 6 months.

For Palmiers
Ingredients
1 sheet puff pastry, all turns completed, thawed
3/4 cup sugar

Folded up to make the palmiers
Directions
1) Preheat the oven to 400 degrees.

2) Remove puff pastry from refrigerator and and roll out into a large rectangle using sugar on both sides instead of flour.  When you have a large rectangle (rolling the dough to about 1/8 - 1/4 inch thick) fold each side of the dough toward the center in thirds and finally on top of itself.

3) Cut the dough much like you would cinnamon rolls and dip each end into a bowl of sugar to add sweetness.  Then place on a greased cookie sheet with about 2 inches on either side to allow it to puff!

4) Bake at 400 for about 8-10 minutes or until it has puffed and begun to brown.  Remove from oven and turn each cookie over so the other side by crisp.  Bake an additional 8-10 minutes.

5) Remove from oven and crunch away! :)


Monday, March 5, 2012

Hot Soft Pretzels

This weekend I was craving more brioche.  We shamelessly devoured the brioche, the whole brioche.  It seems it turned us into brioche addicts and after the third "Gee, I wish we had more brioche" comment from Nick I decided loaf #2 was due!  I set out all the dry ingredients and started mixing.  About half way through you add the butter... THE BUTTER?!  I violated baker rule #1: always check your ingredients first! (As well as baker rule #2: Never, never run out of butter!).  What was I to do?  I didn't want to waste all these lovely ingredients... hmmm.  After a bit of deliberating I settled on soft pretzels.  I had made these before in middle school and loved them.  Now on to adjust the recipe to use the brioche ingredients.


I knew I wanted the pretzels to be a little sweeter and a little saltier than the brioche was... so a little more of each of those was added and we were ready to roll.  Soft pretzels are really fun but they do require an extra step compared to other breads.  In order to get that delicious chewy texture on the outside you have to boil them for a minute or two before you bake them.  Knowing that secret trick from middle school I moved on to start constructing our afternoon treat.


I decided to make two different types.  One brushed with melted butter and salt a la Auntie Anne's pretzels you find in malls.  The second was a cinnamon and sugar pretzel with a cream cheesy icing as Nick likes his pretzels sweeter.  They start out completely the same and even begin their baking process all as a team.  They are divided up in the last few minutes of baking and dressed differently.  This makes it super easy to appease the whole group and their varied tastes.  If you have people that like other flavors feel free to experiment with jalapenos, cheeses, cinnamon and raisins, etc.

Ingredients
yields 10 medium sized soft pretzels
1 package active dry yeast
1 t. sugar
1/4 cup warm water (110-115 degrees)
1/2 cup warm milk (110-115 degrees)
1/4 c. brown sugar
1 egg
2 1/3 cup all-purpose flour
1 t. salt
1 T. baking soda
Toppings
2 T. melted butter
1 T. coarse sea salt or cinnamon and sugar

Directions
1) Dissolve the yeast and teaspoon of sugar into the warm water and allow to sit until it gets foamy - about 2-3 minutes.  Stir the brown sugar, milk, and egg into the yeast mixture.

2) Mix the flour and salt together and slowly add this to the yeast mixture stirring until the mixture becomes stiff and pulls away from the sides of the bowls.  Place the dough on a lightly floured surface and need the dough until it becomes smooth and elastic which should take about 10 minutes.  Alternatively you can do this with a stand mixer and a dough hook allowing the dough to mix for 6-7 minutes or until smooth and elastic.

3) Cover the dough and allow it to rest in warm place until it doubles in size. 

4) Pre-heat the oven to 400 degrees.  And place a pot of water on the stove to boil with 1 T. of baking soda dissolved in it.  

5) Punch down the dough and cut into 10 even pieces.  Roll each piece into a long thin rope - about 18-24 inches in length.  Shape the ropes into pretzels (see graphic).

6) Place each pretzel in the hot water bath for 1 minute, flipping it after 30 seconds.  Place the pretzel on a greased baking sheet and place in the oven for 8-10 minutes or until it begins browning.  

7) Remove the pretzels from the oven and brush each with the melted butter and sprinkle on the salt or cinnamon and sugar and place the pretzels back in the oven for an additional 2-4 minutes or until golden brown.

Serve with hot mustard, cheese sauce, or marinara.

Icing for Cinnamon and Sugar Pretzels
2 T. cream cheese, softened
1 T. milk
1/2 t. vanilla extract
1/3 cup powdered sugar (less if you like it really runny, more if you like it thick)

Whisk together all ingredients and drizzle on top of the pretzels.

Saturday, February 25, 2012

Spiced Kale Chips

I believe it's time for something healthy and green to show its face on this blog!  Don't get me wrong, I love, love , love all the baked goods, chili dogs, and pizzas... I just think it's time for a bit of veg.  I have never much been a fan of leafy greens, mostly because I think they lack flavor.  So I was intrigued when I saw recipes for kale chips.  Baking them makes them light and crunchy and you can add whatever spices you choose to pack in some flavor.


I must admit I was skeptical at first glance and even more skeptical when I tasted the raw kale leaves.  This couldn't be tasty... I carried on though.  Boy am I glad I did.  These turned out so tasty.  Their texture, however, is the best part.  These are the crispiest, crunchiest little treats I ever did eat.  Like they are made out of a mixture of Pop Rocks and dynamite!  Nick and I had a great time competing to see who could crunch the loudest!

This snack was super easy to make and only took about 5 minutes of prep; this is definitely a recipe I am going to keep handy when I need to make a quick veggie.  I read all sorts of flavor combinations with these so fell free to experiment away.  I settled on a spicy, garlicy chip but if you aren't into heat try some Parmesan instead of the red pepper flake for a more savory snack.

Ingredients
Yields 10 snack size servings
1 lbs fresh kale
1 T. olive oil
1 t. sea salt
1/2 t. pepper
1/2 t. garlic powder
1/4 t. crushed red pepper flake

Directions
1) Pre-heat the oven to 275.  Wash and dry the kale leaves.  Using kitchen shears, or a paring knife, remove the stem from the middle of the leaf.  Rip the leaves into small pieces and place in a bowl (or salad spinner).

2) If you have an oil spritzer, spritz the oil onto the leaves.  If you don't have a spritzer drizzle the whole evenly over the leaves and shake well to distribute the oil.  Sprinkle the seasonings evenly over the leaves and shake well to distribute.
Stem Removed

3) Place the leaves on two baking sheets and bake in the pre-heated oven for 15-20 minutes or until they just  begin to brown.  Remove from oven and enjoy the snack!  Just don't crunch so loud it annoys the neighbors! :)

Store the leftover chips in an air-tight container.  Eat within 2-3 days for best flavor.

Sunday, January 22, 2012

Creamy Garlic Hummus

So here it is.  The first recipe post.  For nearly two weeks I went back and forth about what to post.  Which of my recipes to decide on.  I felt like a mom forced to pick one of her favorite children!  Would it be sweet or savory?  Would it be easy or complex?  Would it be comfort food or something more modern?

After much contemplation I finally decided on hummus.  For no other reason than on this cold snowy day I was craving hummus and nothing at the store looked quite right.


I moved apartments a few months ago and while my new place is fantastic it is far away from on of my favorite restaurants that makes the world's creamiest, garliciest, deliciousist hummus.  So while the snow fell quietly outside I processed chickpea after chickpea until I had this absolutely delicious recipe certain to satisfy even the most particular hummus craving.

I absolutely love this hummus.  It's tangy, spicy, garlicy, and creamy all at once.  It goes great with pita bread and a little bit of fresh goat cheese or as the schmear on a sandwich.  

Ingredients
Serves 6-8 as an appetizer
Ingredients
4 T. lemon juice (about 2 lemons)
1/4 cup water
4 T. tahini (sesame paste)
2 T. olive oil, plus an additional 1 T. for drizzling
1 can (14 ounces) chickpeas
3 garlic cloves
1/2 t. salt
1/2 t. ground cumin
1/8 t. cayenne pepper - less if you don't like spicy
1/8 t. paprika (substitute cayenne if you like it hot!)

Directions
1) Drain and rinse the chickpeas. Set aside 4 or 5 chickpeas for garnish at the end. Pour chickpeas, garlic cloves (you can put them in whole or mince them before hand), salt, cumin, parsley, and cayenne pepper in a food processor and process until nearly fully ground (about 15-20 seconds).

Rinsing the Chickpeas
2) Combine lemon juice and water in a measuring cup or small bowl. With the food processor running, pour the lemon juice + water mixture in a steady stream through the feeding tube*(see note).  Scrape down the sides of the bowl then continue to process for an additional 45 seconds.


3)Whisk together the olive oil and tahini a measuring cup or small bowl. With the food processor running, pour the tahini + olive oil mixture in a steady stream through the feeding tube. Scrape down the sides of the bowl and continue to process until creamy or desired texture (about 30-45 seconds).

Ready for the Food Processor
*Note: If you don't have a fancy food processor (I don't!) then add the lemon juice + water mixture in 2 separate batches processing between each batch for about 20 seconds. Scrape down the sides of the bowl after each addition. Follow the same procedure for the tahini + olive oil.

4) Transfer the hummus into a serving dish. Coarsely chop the reserved chickpeas. Sprinkle with paprika (or cayenne pepper) and the reserved chickpeas. Cover with plastic wrap and place in refrigerator for 30 minutes - 48 hours.  When ready to serve remove plastic wrap and drizzle with the additional Tablespoon of olive oil.